[Home Theater Network HDAV.com.cn] If you have a home theater receiver, you can improve its performance by taking some time to set it correctly. Most AV receivers have manual and automatic speaker setup or calibration, and even if you've used auto-calibration, you can make the system sound better by manually fine-tuning.
But is manual calibration really improving the sound quality? If it sounds good, what should I do? We will introduce the following steps today to determine if your home theater is working at its best.
Manually set VS automatic settings
The auto setup system uses a microphone and a series of test tones to determine the various functions of your system—from the size of the speakers, the distance from each speaker to the listening position, and the optimal volume level for each speaker. Most automatic setup systems also use an equalizer to balance the frequency response of all speakers and subwoofers.
There are many options for the calibration procedure, and the more common ones currently used include:
Audyssey -- Denon and Marantz
AccuEQ -- Onkyo (previously used Audyssey)
MCACC (Multichannel Acoustic Calibration) -- Pioneer
DCAC (Digital Cinema Auto Calibration) -- Sony
YPAO (Yamaha Parametric Room Acoustic Optimizer) -- Yamaha
While automatic setup can sometimes be a miracle, don't be overly superstitious. They often misjudge key factors such as the size of the speaker (determining the intersection), the relative volume level, or the excessive use of the equalizer. If your receiver has Dolby Atmos or DTS:X sound with front or rear height channel speakers, the auto setup procedure does not always set the volume correctly. However, your smartphone can do better.

Can I improve the effect of auto calibration?
If you are already using the receiver's automatic settings, first listen to your system and enable it. Each brand's receiver has a different set/equalizer name, but we use Audyssey on the Denon and Marantz receivers as an example.
In the receiver's setup menu, look at these settings under “Audyssey†- “MultEQ XTâ€, “Dynamic Equalizer†and “Dynamic Volume†and try to turn them on or off.
Try listening to familiar movies and music and see if the automatic settings improve the sound. If the sound is better when the equalizer is on, it's great! Don't put your favorite movie anymore! Your system is fine!
Onkyo's AccuEQ, Pioneer's MCACC, Sony's DCAC and Yamaha's YPAO can also apply equalizer solutions, so try to shut them down. You may need to turn off EQ for a day or two and then re-open EQ to hear the difference. If you can't tell the difference, turn off EQ and go to the next step: manual speaker setup.

Get familiar with the receiver's speaker setup menu
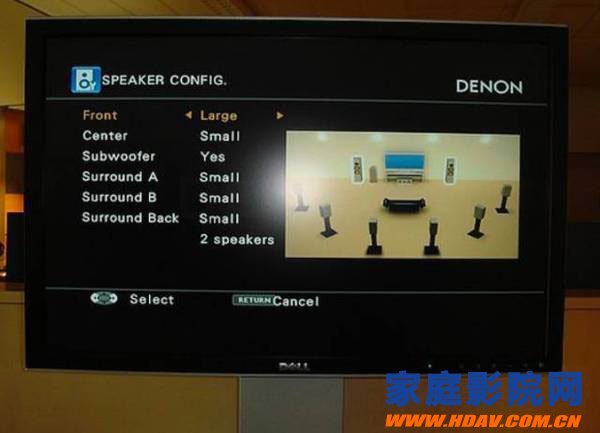
The next step is to choose the number of speakers in your home theater system, sometimes called a speaker configuration. If you have five speakers and a subwoofer, it is 5.1. These systems typically have three front speakers, left, center, and right, as well as two surround channel speakers and sub-speakers. The seven-channel (7.1) system has three front speakers—left, center, right, four surround speakers, and a subwoofer.
Dolby Atmos or DTS:X systems have different layouts, they may have five front speakers, left, center and right, two height channel front speakers, and two side or rear surround channel speakers. And a subwoofer. You will see some articles listing numbers like 7.1.2, the last one being the number of height speakers.

Set the size of the speaker
Once you have selected the number of speakers, select the size of each speaker in the system. Floor speakers or large bookshelf speakers should be “large†and all other speakers should be configured as “smallâ€. Here's a simple trick: when you have a question about size, it's okay to choose "small". Next, look for the crossover setting option on the speaker setup menu. If your speakers have a 100 Hz woofer of 4 inches or less, any speaker woofer can use 80 Hz. If you are unsure of the speaker's woofer size, use the 100Hz crossover setting. Large speakers usually do not require crossover settings.
Next, use a tape measure to measure the distance from each speaker and subwoofer to the listening position. Enter these measurements in the "speaker distance" menu.

Set the volume of each speaker
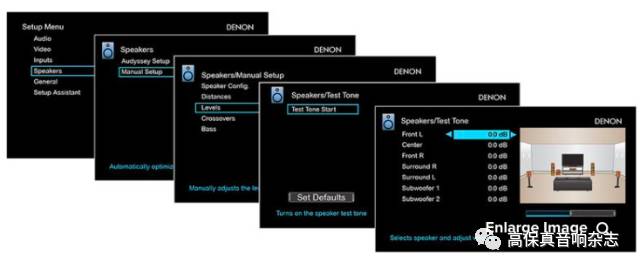
Next, we need to balance the “channel level†of each speaker in the system, making them equally loud. Look for the “Test Tone†setting on the Speaker Setup menu, set by playing one speaker at a time. To balance the volume, you'll need a physical sound pressure meter, such as the Parts Express mini digital sound level meter or the free Sound Analyzer app for Android phones, or the iPhone's free Sound Level Analyzer Lite app. These meters have their own settings, selecting the "C" weighting and the "Slow" response. Sit in the best position, place your microphone or smartphone near your face and remain still during the calibration process.
Now, start the receiver's test mode with a single speaker, giving each speaker a medium sound pressure level - we recommend 75 decibels (dB). Adjust the receiver's master volume control so that the pitch level rises or falls to the same 75dB. When running a test tone (sounds like a noisy sound or hum), the room should be as quiet as possible, so turn off your air conditioner and close all doors and windows.
Here are some typical settings for each speaker and reference level (75dB):
Left and right channel + 0dB
Center channel + 3dB
Rear channel -3dB
Dolby Atmos height channel + 3db
Subwoofer -10dB
Use the single channel test mode to make the “channel level†adjustments on the receiver setup menu for each speaker as close as possible. Take the time to repeat several times and test to fine tune the level of each speaker.
When using the system, if you find it difficult to hear a movie conversation, increase the center channel volume to 78 dB. In this way, the dialogue will be more clearly revealed, but if it is still not clear enough, you can freely add some dB. Don't worry, the speakers won't be damaged! Similarly, raising the height of the speaker level above 3db can help you get more immersive.
Set the subwoofer
Although this speaker structure is very simple, setting up the subwoofer requires a few extra steps. This is because, unlike other speakers, it is a power unit with its own volume control. First, set the subwoofer's volume knob to the middle position, then use the test mode to set the volume level, which requires 75dB of sound pressure level as with other speakers.
This is just a starting point. The accuracy of the bass sound level reading (manual or automatic setting) may be incorrect, so you may need to increase or decrease the volume later. You can do this using the setup menu or the sub volume knob, depending on which is easier for you. Getting the perfect subwoofer volume can take some time. When you watch a movie or listen to music, you may feel that you need to adjust to find the right settings. When you don't know how best he is, the easiest way to tell is that you feel the bass of the subwoofer seems to come from your main speaker.
carry out
The menu for each receiver is different, so our description may not be fully applicable to your receiver. So before making any changes, open the settings menu and see what's there. It's also a good idea to write down or take a picture of the menu settings before making any changes, just in case you accidentally messed up.
Manual calibration takes more time than automated programs. To trust your own ears to be much more sensitive than a microphone, manual calibration can help you set the system to the state you want.
More fresh and fun home theater information, please pay attention to home theater network http:// (WeChat: cnhifi), the country's most influential home theater audio player interactive media website.
"Non-burning, nicotine for users, low tar content. As the heating temperature (below 500℃) is lower than the combustion temperature of traditional cigarettes (600-900℃), the harmful components produced by tobacco high-temperature combustion pyrolysis and thermal synthesis are reduced, and the release amount of side-flow smoke and environmental smoke (second-hand smoke) is also greatly reduced."
Heating non - combustion products are electronic devices containing tobacco. When you heat them, they produce a nicotine-containing vapor that you can inhale.
They are different from traditional cigarettes and work by heating tobacco to a very low temperature. Tobacco is heated to 350 ° C in a heat-incombustible device, while traditional cigarettes burn at up to 900 ° C.
Still, the temperature at which non-combustion products are heated is high enough to vaporize and inhale harmful chemicals.
Although both are electronic devices, heated non-combustible products are also different from e-cigarettes or steam devices. These usually use chemical liquids and do not necessarily contain nicotine. E-cigarettes tend to heat liquids to around 250 degrees Celsius to produce vapor.
Hnb Device Oem,Hnb Device Patent,Hnb Device,Hnb Device For Sale
Shenzhen MASON VAP Technology Co., Ltd. , https://www.cbdvapefactory.com