The serial interface is a device that can convert parallel data characters from the CPU into a continuous serial data stream and convert the received serial data stream into parallel data characters for the CPU. The circuit that generally accomplishes this function is called a serial interface circuit.
Serial communication structureSerial communication refers to a communication method between a peripheral device and a computer to transmit data by bit through a data signal line, a ground line, a control line, and the like. This communication method uses less data lines and can save communication costs in long-distance communication, but its transmission speed is lower than parallel transmission.
The serial port is a very common device communication protocol on a computer. Most computers (excluding laptops) contain two RS-232 based serial ports. The serial port is also a common communication protocol for instrumentation equipment; many GPIB-compatible devices also have an RS-232 port. At the same time, the serial communication protocol can also be used to obtain data of the remote acquisition device.
RS-232 (ANSI/EIA-232 standard) is a serial connection standard on IBM-PC and its compatible machines. Can be used for many purposes, such as connecting a mouse, printer or Modem, but also to industrial instrumentation. For the improvement of driving and wiring, the transmission length or speed of RS-232 in practical applications often exceeds the standard value. RS-232 is limited to point-to-point communication between the PC serial port and the device. The maximum distance for RS-232 serial communication is 50 feet.
Serial communicationSerial communication is very common in engineering applications. In the process of communication between the upper computer and the lower computer, the serial communication is often used, and the serial communication is widely used in the low-speed transmission mode. Before I talk about it, let's briefly explain the concept of the upper computer and the lower computer.
Host computer and lower computer designUsually, the upper computer refers to the PC, and the lower computer refers to the single chip microcomputer or the system with the microprocessor. The lower computer generally converts the analog signal into digital quantity through AD acquisition, and the lower computer sends the digital signal to the upper computer through the serial port after the digital signal processing. On the contrary, the upper computer can send some instructions or information to the lower computer. Common communication serial ports include RS232, RS485, RS422 and so on. These serial ports only have different level characteristics. When the host computer and the lower computer perform data communication, the level characteristics can be ignored, and now there are various transfer interfaces on the hardware, which is convenient to use.
Of course, in the simple serial UART experiment, we can use a variety of serial port assistant software, but these serial port tools sometimes do not meet the needs well, then try to write your own serial port assistant. ? Next, talk about how to use java to achieve RS485 serial communication between the host computer and the lower computer.
Step 1: Download the jar package that supports java serial communication, here is the download address:
http://files.cnblogs.com/files/Dreamer-1/mfz-rxtx-2.2-20081207-win-x86.zip(32bit download address)
http://files.cnblogs.com/files/Dreamer-1/mfz-rxtx-2.2-20081207-win-x64.zip (64-bit download address)
Explain the above version, because I stepped on a pit here, 32-bit or 64-bit is consistent with ecplise/myecplise, if the version is wrong, it will report an error.
Step 2: After downloading the jar package, the following will appear:

There are two points to note in this folder: the jar package RXTXcomm needs to be imported into the java project. In addition, you need to copy rxtxParallel.dll and rxtxSerial.dll in the bin file of JDK and the bin folder of jre, so that you can use this jar package normally. The following is where to copy the two dll files:
C:\Program Files (x86)\Java\jdk1.8.0_25\bin\
C:\Program Files (x86)\Java\jdk1.8.0_25\jre\bin\12
How to say jar package import java project is a relatively simple operation, you can refer to: http://jingyan.baidu.com/arTIcle/ca41422fc76c4a1eae99ed9f.html
Step 3: How to use RXTXComm Api
The next step is to use the import jar package to encode the serial port communication function. Before the coding, let's take a look at the main links of serial communication. My summary is mainly divided into the following points:
1) The computer first needs to perform a hardware check to find out if there is a COM port available, and make a brief judgment on the pair of ports, including whether these ports are serial ports and whether they are in use. Here are some of the main code:
/* class method cannot be changed without accepting inheritance
* Scan for available serial ports
* Add available serial port to list and save to list
*/
Public staTIc final ArrayList "String" uartPortUseAblefind()
{
/ / Get all current available serial ports
/ / Provide method by the CommPorTIdenTIfier class
Enumeration "CommPortIdentifier" portList=CommPortIdentifier.getPortIdentifiers();
ArrayList "String" portNameList=new ArrayList();
/ / Add and return ArrayList
While(portList.hasMoreElements())
{
String portName=portList.nextElement().getName();
portNameList.add(portName);
}
Return portNameList;
}123456789101112131415161718
The following is a test case for the test class:
ArrayList "String" arraylist=UARTParameterSetup.uartPortUseAblefind();
Int useAbleLen=arraylist.size();
If(useAbleLen==0)
{
System.out.println("No serial port available, please check device!");
}
Else
{
System.out.println ("The following ports have been queried on this computer can be used:");
For(int index=0;index"arraylist.size();index++)
{
System.out.println("The COM port name:" +arraylist.get(index));
/ / Test the serial port configuration related methods
}
} 123456789101112131415
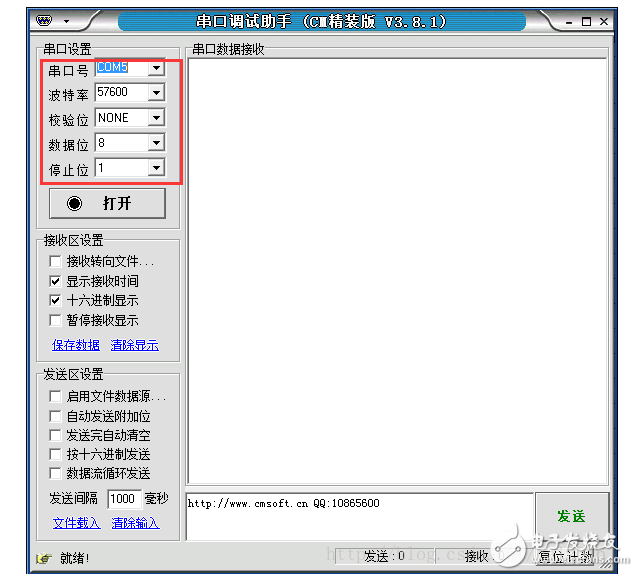
2) After the self-test of the serial port by the computer, the serial port parameters can be simply configured. Common configurations can be inspired by common serial port assistants. The following is a human-machine interface for a serial port assistant:

The following is the main code for the serial port:
/*
* Serial port common settings
* 1) Open the serial port
* 2) The baud rate can be set to 57600 according to the requirements of the single board. . .
* 3) Determine if the port device is a serial device
* 4) Is the port occupied?
* 5) After checking the above conditions, return a serial port setting object new UARTParameterSetup()
* 6) return: return a SerialPort instance object, if the com port is determined to be a serial port, parameter configuration
* If not, return the SerialPort object to be null
*/
Public static final SerialPort portParameterOpen(String portName, int baudrate)
{
SerialPort serialPort=null;
Try
{ //Identify the serial port by port name
CommPortIdentifier portIdentifier = CommPortIdentifier.getPortIdentifier(portName);
/ / Open the port and set the port name serialPort and timeout time 2000ms
CommPort commPort=portIdentifier.open(portName,1000);
/ / Further determine whether the comm port is a serial interface instanceof
If(commPort instanceof SerialPort)
{
System.out.println("The COM port is a serial port!");
// further cast type
serialPort=(SerialPort)commPort;
/ / Set baudrate here need to pay attention: baud rate can only be allowed to int type for 57600 enough
//8-bit data bits
//1 stop bit
//no parity
serialPort.setSerialPortParams(baudrate, SerialPort.DATABITS_8,SerialPort.STOPBITS_1, SerialPort.PARITY_NONE);
/ / Serial port configuration complete log
System.out.println ("Serial port parameter setting is completed, baud rate is + baudrate+", data bit is 8bits, stop bit is 1 bit, no parity");
}
/ / Not a serial port
Else
{
System.out.println ("The com port is not a serial port, please check the device!");
//Set the com port to null. The default is null. No action is required.
}
}
Catch (NoSuchPortException e)
{
e.printStackTrace();
}
Catch (PortInUseException e)
{
e.printStackTrace();
}
Catch (UnsupportedCommOperationException e)
{
e.printStackTrace();
}
Return serialPort;
}12345678910111213141516171819202122232425262728293031323334353637383940414243444546474849505152535455455
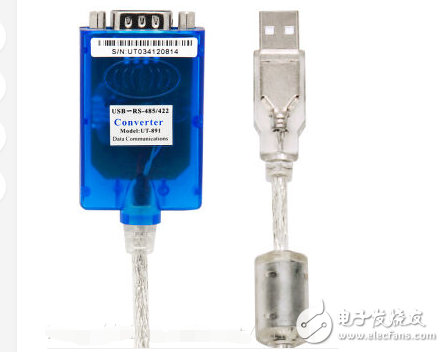
The above code is to return an object, but also returns the object property, because the object is a pass-through reference in java. Need to explain the above: In the experiment, you need to connect the serial port to let the computer detect it to make the program work. Here is the RS485 adapter cable:

3) After the above two steps, the basic serial port setting is also completed. For the serial port type confirmation, for example, RS232/RS485/RS422, etc., it can be used as a condition for further confirmation. RS485 can be found in gnu.io.

Next, the function of two-way communication between the upper computer and the lower computer is realized. This part is mainly realized by using the input and output streams of java. Here is the main code:
/*
* Serial data transmission and data transmission as a class
* This class is mainly used to realize the transmission of data packets to the next single board machine.
*/
Class DataTransimit
{
/*
* The host computer sends data to the single board through the serial port.
* Serial port object seriesPort
* Data frame: dataPackage
* Flag sent: The data was not sent successfully and an exception was thrown
*/
Public static void uartSendDatatoSerialPort(SerialPort serialPort,byte[] dataPackage)
{
OutputStream out=null;
Try
{
Out=serialPort.getOutputStream();
Out.write(dataPackage);
Out.flush();
} catch (IOException e)
{
e.printStackTrace();
}finally
{
/ / Close the output stream
If(out!=null)
{
Try
{
Out.close();
Out=null;
System.out.println ("Data has been sent!");
} catch (IOException e)
{
e.printStackTrace();
}
}
}
}
/*
* The host computer receives data
* Serial port object seriesPort
* Receive data buffer
* returns a byte array
*/
Public static byte[] uartReceiveDatafromSingleChipMachine(SerialPort serialPort)
{
Byte[] receiveDataPackage=null;
InputStream in=null;
Try
{
In=serialPort.getInputStream();
/ / Get the data buffer data length
Int bufferLength=in.available();
While(bufferLength!=0)
{
receiveDataPackage=new byte[bufferLength];
In.read(receiveDataPackage);
bufferLength=in.available();
}
}
Catch (IOException e)
{
e.printStackTrace();
}
Return receiveDataPackage;
} 12345678910111213141516171819202122232425262728293031323334353637383940414243444546474849505152535455565758596061626364364667686686970
Through the above two basic classes of Uart to achieve the functional package of the underlying Uart, one of the classes is mainly responsible for the Uart serial port self-test and basic settings, and the other one is mainly the two methods of data transmission. Next, let's talk about an example to send the current time of the system to the single board system through RS485 serial communication.
Step 4: Real-time system time packet transmission to the lower computer
This step can be divided into the following two steps: firstly, the system time is obtained, and the time is encapsulated into a frame; the other is to send the time data packet to the single board machine system for analysis through the RS485 serial port.
1) System time acquisition
According to Java's object-oriented design ideas, the methods related to system time are classified into one class.
Here's the current system timecode:
Public static String getCurrentDateTime()
{
// singleton mode
Calendar calendar=Calendar.getInstance();
Int year = calendar.get(Calendar.YEAR);//Get the year
Int month=calendar.get(Calendar.MONTH);//Get the month
Int day=calendar.get(Calendar.DATE);//Get date
Int minute=calendar.get(Calendar.MINUTE);//minute
Int hour=calendar.get(Calendar.HOUR);//hour
Int second=calendar.get(Calendar.SECOND);//sec
String curerentDateTime = year + “ †+ (month + 1 )+ “ †+ day + “ â€+ (hour+12) + “ †+ minute + “ †+ second + “ â€;
timeCheckSum=year+(month+1)+day+(hour+12)+minute+second;
Return curerentDateTime;
}1234567891011121314
Java provides the calender class, which provides some time-related methods. As for Calendar.getInstance() to get a Calendar instance object using the singleton pattern, the singleton pattern is a class that only allows one instantiated object at any time. Obtaining the system time In addition to using Calendar, you can also use the Date class. You can also get the current time of the system by creating objects. The timeCheckSum is sent as a checksum of the time data to the board as part of the custom protocol.
Since the transmitted data packet is usually transmitted and transmitted in units of bytes, it is necessary to convert the int type time into a byte and store it as a data packet using byte[].
/*
* Separate the above time strings by byte[]
*/
Public static byte[] dateTimeBytesGet(String currenDateTime)
{
/ / Format the current time parameters
/ / Judging the format
Int rawDataSize=6;
Byte[] dateTimeBytes=new byte[rawDataSize+1];
String[] currentDateTimeSplit=currenDateTime.split(" ");
If(currentDateTimeSplit.length==rawDataSize)
{
/ / Time data format is correct
//eg 2016 12 23 22 18 26
/ / Use byte [] to store -128~+127
/ / Use two byte storage for the year
For(int dataIndex=0;dataIndex"rawDataSize;dataIndex++)
{
Int dateTemp=Integer.parseInt(currentDateTimeSplit[dataIndex]);
If(dataIndex==0)
{
Byte H8bits=(byte)((dateTemp)》"8);
Byte L8bits=(byte)((dateTemp)&0xff);
dateTimeBytes[dataIndex]= H8bits;
dateTimeBytes[dataIndex+1]= L8bits;
}
dateTimeBytes[dataIndex+1]=(byte)dateTemp;
}
}else
{
System.out.println ("current time gets exception data");
System.exit(-1);
dateTimeBytes=null;
}
Return dateTimeBytes;
}123456789101112131415161718192021222324252627282930313233343536
The above data can be stored in 7 bytes for time data, because the year needs to use two bytes to store, the format is high byte first, low byte after, and then stored.
After storing the time data in the byte[] array, the next step is to add your own protocol part. This part is more arbitrary, because the protocol can have different forms depending on the style. For the sake of simplicity, it is only necessary to add three bytes of head, CMD, and time data length length before the time data byte[], and the time data byte[] is followed by the high and low bytes of the checksum and the tail instruction. . The above basically implements a simple time data package. The following is the code for this module:
/*
* Encapsulate arrays into frames
* Each data frame consists of the following parts
* 1) Packet header head 0X2F
* 2) Packet command CMD 0X5A
* 3) Number of data length of data 7
* 4) Checksum H8/L8 byte of check sum (high byte before the low byte)
* 5) Data end mark tail OX30
* 6) can use thread to get the current time
*/
Public static byte[] makeCurrentDateTimefromStringtoFramePackage(byte[] dateTimeBytes)
{
/ / Add some package check information before and after the time byte[]
Int dataLength=13;
Byte[] terimalTimePackage=new byte[dataLength];
/ / Filling information
/ / Information before the time packet
terimalTimePackage[0]=0x2F;
terimalTimePackage[1]=0X5A;
terimalTimePackage[2]=7;
/ / Calculate the checksum
/ / Convert to unsigned for verification
For(int dataIndex=0;dataIndex"dateTimeBytes.length;dataIndex++)
{
terimalTimePackage[dataIndex+3]=dateTimeBytes[dataIndex];
}
/ / Split the checksum into high and low bytes
Byte sumH8bits=(byte)((timeCheckSum)》8);
Byte sumL8bits=(byte)((timeCheckSum)&0xff);
terimalTimePackage[10]=sumH8bits;//high byte first
terimalTimePackage[11]=sumL8bits;//low byte is after
/ / end of the packet
terimalTimePackage[12]=0X30;
Return terimalTimePackage;
}1234567891011121314151617181920212223242526272829303132333435
The following is a debug code that parses the time data byte array. On the one hand, it determines the program reliability of the module of the upper part of the host computer, and can also be directly transplanted to the lower computer to parse the data packet. Need to pay attention to the lower machine resolution process: because the 8 basic types in java are signed, the year and time checksum is split into high and low bytes, the low byte is binary unsigned, but the computer It is read according to the signed number (complement code), for example, converted to binary number in 2016, then the high byte is 00000111 and the low byte is 11100000. The computer reads: the high byte is 7 and the low byte is -32. In fact, the process of real restoration by two bytes should be: 7 "8 + (low byte binary number) = 7 * 256 + 224 = 2016, so you need to convert signed numbers to unsigned when debugging time packets digital.
/*
* Parse the time format and restore the original time format
* Restore data
* Only for debug use
*/
Public static String dateTimeBytesfromTostring(byte[] currentDateTime)
{
String string="";
If(currentDateTime.length==7)
{
String=((currentDateTime[0]""8)+bytetoUnsigendInt(currentDateTime[1]))+""+currentDateTime[2]+" â€+
currentDateTime[3]+" "+currentDateTime[4]+" "+currentDateTime[5]+" â€+
currentDateTime[6];
}
Return string;
}
/*
* Convert byte to a string
* Convert signed bytes to unsigned numbers
*debug use
*/
Public static int bytetoUnsigendInt(byte aByte)
{
String s=String.valueOf(aByte);
//System.out.println(s);
Int bytetoUnsigendInt=0;
For(int i=0;i"s.length();i++)
{
If(s.charAt(i)!='0')
{
bytetoUnsigendInt+=1 "(7-i);
}
}
Return bytetoUnsigendInt;
}12345678910111213141516171819202122232425262728293031323334353637
2) Send the last time packet to the lower computer through the RS485 serial port
Combined with the previous serial port program, you can use the serial port to send the program. In the early stage of the program debug, you can output the log at the key position of the program. The method of printing the log can improve the efficiency of program debugging. The following is the test code for the main class:
/ / Take out the first COM port for testing
SerialPort serialPort=UARTParameterSetup.portParameterOpen(arraylist.get(0), 57600);
/ / Exit the program does not need to monitor because transimit always needs to ensure the connection status
//System.exit(0);
DataTransimit.uartSendDatatoSerialPort(serialPort, dataFrame);
String currentDateTime=SystemDateTimeGet.getCurrentDateTime();
System.out.println(currentDateTime);
Byte[] bytes=SystemDateTimeGet.dateTimeBytesGet(currentDateTime);
//System.out.println(Arrays.toString(bytes));
String str=SystemDateTimeGet.dateTimeBytesfromTostring(bytes);
System.out.println(str);
//System.out.println(SystemDateTimeGet.bytetoUnsigendInt((byte) -32));
Byte[] terimalTimeByte=SystemDateTimeGet.makeCurrentDateTimefromStringtoFramePackage(bytes);
System.out.println(Arrays.toString(terimalTimeByte));
DataTransimit.uartSendDatatoSerialPort(serialPort, terimalTimeByte);123456789101112131415
The following are the test results:The console prints a message when no serial device is connected to the computer:
Did not find the available serial port, please check the device!
12
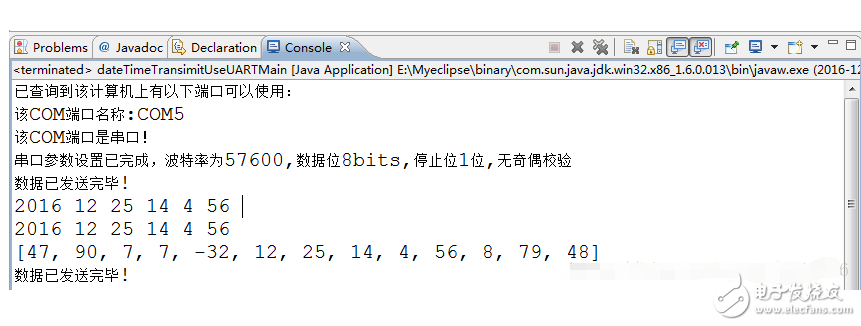
When the RS485 device is connected to the computer, the console prints the message as follows:

Through the above steps, the function of serial communication between the upper computer and the lower computer is basically realized, and then the program can be improved:
1) Add interface, you can design a unique human-computer interaction interface according to your own needs.
2) Add a thread in the program. In the above program, the acquisition of the system time can be obtained by means of a thread, so that the host computer can send the data packet to the lower computer all the time, instead of just sending it once.
3) For the upper computer data reception, in addition to the above basic receiving function, you can also use JDBC and mysql data for storage, and draw data curve to achieve characteristic analysis.
Sewing Machine Motor,Dc Motor Sewing Machine,Industrial Sewing Machine,Brushless Servo Motor
LISHUI SHUANGZHENG MOTOR CO.,LTD. , https://www.szservomotor.com