51 MCU is a general term for all MCUs compatible with Intel 8031 ​​instruction system. The first ancestor of this series of MCUs is Intel's 8004 MCU. Later, with the development of Flash rom technology, the 8004 MCU has made great progress and become one of the most widely used 8-bit MCUs. Its representative model is ATMEL's AT89 series. Widely used in industrial measurement and control systems. Many companies have launched 51 series compatible models, which will occupy a large number of markets for a long time to come. 51 single-chip microcomputer is a single-chip computer that is the basic introduction, or the most widely used one. It should be noted that the 51 series of single-chip microcomputers generally do not have self-programming capabilities.
First, the serial communication programming process on the PC is as follows:1. Establish a project
Open VC++6.0 and create a dialog-based MFC application SCommTest (consistent with my source code, you will be more convenient);
2. Insert the MSComm control in the project
Select the Components and Controls... option in the Add To Project submenu under the Project menu. Double-click the Registered ActiveX Controls item in the pop-up dialog box (wait a moment, the process is slow), then all registered ActiveX controls appear in the list. In the box. Select Microsoft Communications Control, version 6.0, and click the Insert button to insert it into our Project and accept the default options. (If you don't see Microsoft Communications Control, version 6.0 in the control list, it may be that you did not select ActiveX when installing VC6, reinstall VC6, select ActiveX)
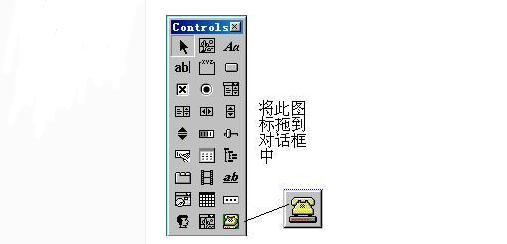
At this point in the ClassView window you can see the CMSComm class, (Note: this class can not be seen in the ClassWizard, the same is the refactoring clw file), and the phone icon appears in the Controls toolbar Controls (Figure 1 Show), what you need to do now is to drag this icon to the dialog box with the mouse. After the program runs, the icon is not visible.

3. Use the ClassWizard to define the CMSComm class control object
Open the ClassWizard-Member Viariables tab, select the CSCommTestDlg class, and add the control variable: m_ctrlComm to IDC_MSCOMM1. At this point you can take a look and add the //{{AFX_INCLUDES() #include "mscomm." in the dialog header file. h" //}}AFX_INCLUDES (Run the program at this time, if there is something wrong, then start from scratch).
4. Add controls to the dialog
Add two edit boxes to the main dialog box. One is used to receive the display data ID as IDC_EDIT_RXDATA, the other is used to input the send data, the ID is IDC_EDIT_TXDATA, and then a button is added. The function is to send the contents of the edit box once. Send once and set its ID to IDC_BUTTON_MANUALSEND. Don't forget to select the Miltiline and Vertical Scroll properties in the Properties->Styles that will receive the edit box. Send the edit box. If you want to enter multiple lines of text, you can also choose Miltiline.
Then open the ClassWizard->Member Viariables tab, select the CSCommTestDlg class, add the CString variable m_strRXData to IDC_EDIT_RXDATA, and add the CString variable m_strTXData to IDC_EDIT_TXDATA. Description: m_strRXData and m_strTXData are used to put the received and sent character data.
5. Add serial event message processing function OnComm()
Open ClassWizard->Message Maps, select class CSCommTestDlg, select IDC_MSCOMM1, double-click the message OnComm, the function name will be changed to OnComm in the pop-up dialog box, (good to remember) OK.
This function is used to process serial message events. For example, whenever the serial port receives data, it will generate a serial port to receive the message event in the data buffer. The function we just added will be executed. We are in the OnComm() function. Add the appropriate processing code to achieve the desired function. Please add the following code to the function:
Void CSCommTestDlg::OnComm()
{
// TODO: Add your control notification handler code here
VARIANT variant_inp;
COleSafeArray safearray_inp;
LONG len,k;
BYTE rxdata[2048]; //Set the BYTE array An 8-bit integerthat is not signed.
CString strtemp;
If(m_ctrlComm.GetCommEvent()==2)//The event value is 2, indicating that there is a character in the receive buffer.
{//////// Below you can add processing code according to your own communication protocol.
Variant_inp=m_ctrlComm.GetInput();//Read buffer
Safearray_inp=variant_inp;//VARIANT type variable is converted to ColeSafeArray type variable
Len=safearray_inp.GetOneDimSize();//Get valid data length
For(k=0;k“len;k++) “/len;k++)
safearray_inp.GetElement(&k,rxdata+k);//convert to BYTE array
For(k=0;k“len;k++) p=â€â€ Converts an array to a cstring variable
{
BYTE bt=*(char*)(rxdata+k);//character
strtemp.Format("%c", bt); / / send characters into the temporary variable strtemp storage
m_strRXData+=strtemp;//Add the corresponding string of the receive edit box
}
m_strRXData+=“rnâ€; //newline
}
UpdateData (FALSE); / / update the contents of the edit box
}
Stage Effect Lights,Led Laser Moving Head,Strobe Stage Lighting,Moving Head Strobe
Guangzhou Cheng Wen Photoelectric Technology Co., Ltd. , https://www.cwledwall.com