In the previous article, we explained the basic principles of convolutional neural networks, including the definition of several basic layers, the operation rules, and so on. This article mainly describes how a convolutional neural network performs a complete training, including forward propagation and back propagation, and writes a convolutional neural network by itself. If you do not understand the basic principles, you can first look at the last article: â€â€â€â€ [deep learning series] CNN principle convolutional neural network explained (a) - the basic principle
Forward propagation of convolutional neural networksLet's first look at one of the simplest convolutional neural networks:
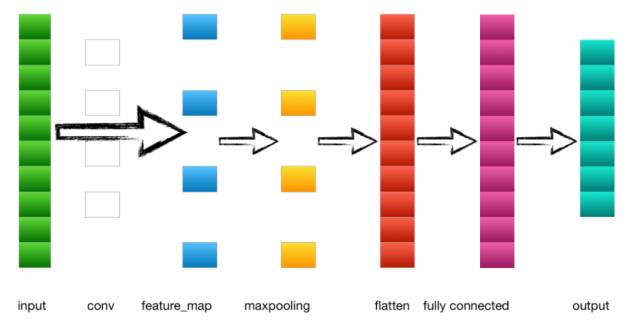
1. Input layer ----> Convolution layer
In the above example of an example, the input is a 4*4 image. After two convolutional operations of 2*2 convolution kernels, it becomes two 3*3 feature_maps.
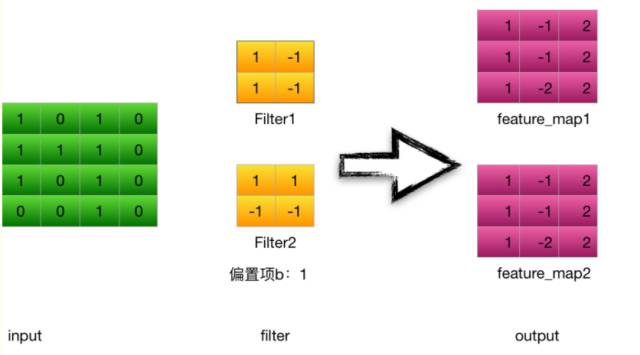
Take the convolution kernel filter1 as an example (stride = 1 ):
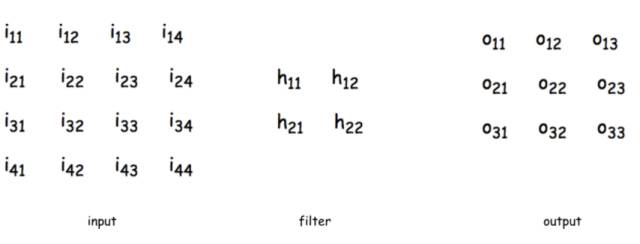
Calculate the input of the first convolutional neuron o11:

Output of neuron o11: (Relu activation function is used here)

Other neurons calculate in the same way
2. Convolution layer ----> Pooled layer
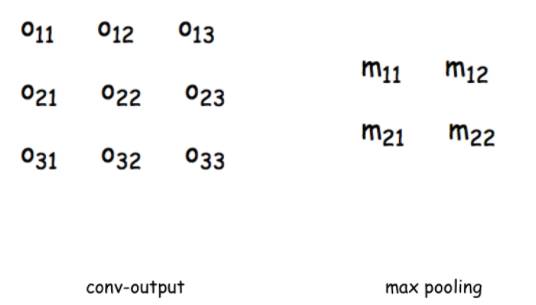
Calculate the input of the pooling layer m11 (take window 2 * 2), the pooling layer has no activation function

3. Pooled layer ----> Fully connected layer
The output of the pooling layer is flattened to the flatten layer and then to the fully connected layer.
4. Fully connected layer ----> output layer
The full connection layer to the output layer are adjacent connections between normal neurons and neurons. After being calculated by the softmax function and output to output, different types of probability values ​​are obtained. The type with the largest output probability is the category of the picture.
Reverse propagation of convolutional neural networks
The traditional neural network is fully connected. If backpropagation is performed, it is only necessary to continuously seek the partial guide from the next layer, that is, to find the error-sensitive items of each layer by seeking the partial bias. Then the gradient of the weights and offsets is found and the weights can be updated. Convolutional neural networks have two special layers: convolutional layers and pooled layers. The output of the pooling layer does not require an activation function. It is the maximum value of a sliding window, a constant, and its partial derivative is 1. The pooling layer is equivalent to a compression of the upper picture, which is different from the traditional backward propagation mode in the reverse estimation of the error-sensitive items. When back-propagating from the convolutional feature_map to the previous layer, since the forward propagation is a feature_map obtained by a convolution operation through a convolution kernel, the reverse propagation is not the same as the conventional one, and the convolution kernel needs to be updated. parameter. Here we describe how the pooling and convolutional layers do the reverse propagation.
Before the introduction, first review the traditional back propagation method:

Forward propagation is available:

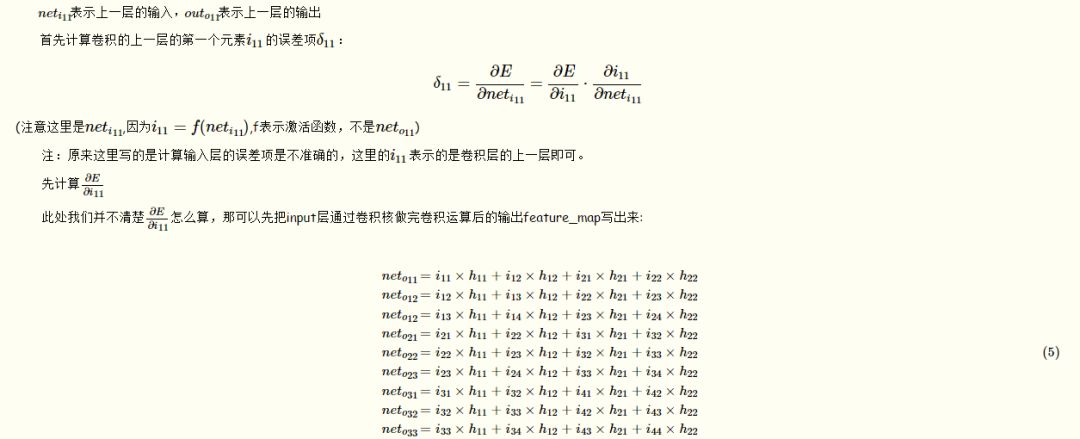
Then in turn sort the input elements
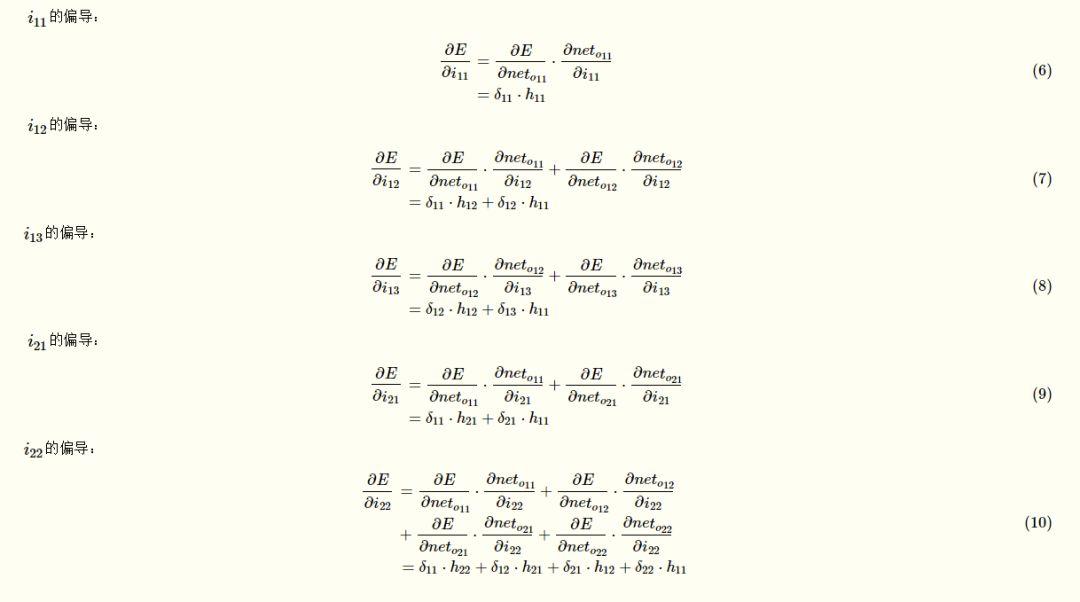
Observe the laws of the above formulas. To summarize, you can get the following expression:

The convolution kernel in the figure undergoes a 180° flip, and after the convolution operation of the zero-addition matrix around this layer of the error-sensitive term matrix deltai,j)deltai,j), we can get ∂E/∂i11, That is, ∂E/∂ii,j=∑m⋅∑nhm,nδi+m,j+n
After the first item is finished, we come to the second item ∂i11/∂neti11

At this point, our error-sensitive matrix is ​​calculated. After the error-sensitive matrix is ​​obtained, the gradient of the weight can be obtained.
Since the expression between the input neto11 and the weights hi,j of the convolutional layer has been written above, it can be directly found:

Inferring the gradient of weights:

The gradient of the bias term:

As can be seen, the bias of the bias term is equal to the sum of all error-sensitive terms in this layer. Once the weights and gradients of the bias terms have been obtained, the weights and gradients can be updated according to the gradient descent method.
Backward propagation of pooled layers
Backward propagation of the pooled layer is better. Look at the graph below. The left side is the output of the upper layer, that is, the feature_map of the output of the convolutional layer, the input to the pooling layer on the right, or the propagation according to the forward direction. , Write out the formula to facilitate calculation:
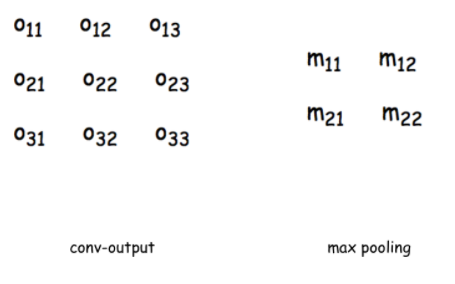
Assume that the maximum value of the sliding window above the layer is outo11

In this way, the error-sensitive term matrix of the pooled layer is found. Similarly, you can find the gradient of each neuron and update the weights.
Handwriting a convolutional neural network1. Define a convolutional layer
First we use ConvLayer to implement a convolutional layer that defines the hyperparameters of the convolutional layer.
Class ConvLayer(object):
'''
The meaning of the parameters:
Input_width: input image size - width
Input_height: input image size - length
Channel_number: number of channels, color 3, gray 1
Filter_width: the width of the convolution kernel
Filter_height: the length of the convolution kernel
Filter_number: the number of convolution kernels
Zero_padding: length of zero-padding
Stride: step size
Activator: activation function
Learning_rate: learning rate
'''
Def __init__(self, input_width, input_height,
Channel_number, filter_width,
Filter_height, filter_number,
Zero_padding, stride, activator,
Learning_rate):
Self.input_width = input_width
Self.input_height = input_height
Self.channel_number = channel_number
Self.filter_width = filter_width
Self.filter_height = filter_height
Self.filter_number = filter_number
Self.zero_padding = zero_padding
Self.stride = stride
Self.output_width =
ConvLayer.calculate_output_size(
Self.input_width, filter_width, zero_padding,
Stride)
Self.output_height =
ConvLayer.calculate_output_size(
Self.input_height, filter_height, zero_padding,
Stride)
Self.output_array = np.zeros((self.filter_number,
Self.output_height, self.output_width))
Self.filters = []
For i in range(filter_number):
Self.filters.append(Filter(filter_width,
Filter_height, self.channel_number))
Self.activator = activator
Self.learning_rate = learning_rate
Where calculate_output_size is used to calculate the size of feature_map output after convolution operation
@staticmethod def calculate_output_size(input_size,
Filter_size, zero_padding, stride):
Return (input_size - filter_size +5
2 * zero_padding) / stride + 1
2. Construct an activation function
The RELU activation function is used here, so we define it in activators.py. Forward is the forward calculation and backforward is the derivative of the calculation formula:
Class ReluActivator(object):
Def forward(self, weighted_input):
#return weighted_input
Return max(0, weighted_input)
Def backward(self, output):
Return 1 if output > 0 else 0
Other common activation functions we can also put into activators, such as sigmoid function, we can define as follows:
Class SigmoidActivator(object): def forward(self, weighted_input): return 1.0 / (1.0 + np.exp(-weighted_input)) #the partial of sigmoid def backward(self, output): return output * (1 - output)
If we need to automatically use other activation functions, we can define a class in activator.py.
3. Define a class, save the convolutional layer parameters and gradients
Class Filter(object):
Def __init__(self, width, height, depth):
# Initial weight
Self.weights = np.random.uniform(-1e-4, 1e-4,
(depth, height, width))
# Initial offset
Self.bias = 0
Self.weights_grad = np.zeros(
Self.weights.shape)
Self.bias_grad = 0
Def __repr__(self):
Return 'filter weights: %s bias: %s' % (
Repr(self.weights), repr(self.bias))
Def get_weights(self):
Return self.weights
Def get_bias(self):
Return self.bias
Def update(self, learning_rate):
Self.weights -= learning_rate * self.weights_grad
Self.bias -= learning_rate * self.bias_grad
4. Forward propagation of convolution layers
1). Get Convolution Area
# Get Convolution Area
Def get_patch(input_array, i, j, filter_width,
Filter_height, stride):
'''
Get this convolved area from the input array,
Automatically adapts inputs to 2D and 3D
'''
Start_i = i * stride
Start_j = j * stride
If input_array.ndim == 2:
Input_array_conv = input_array[
Start_i : start_i + filter_height,
Start_j : start_j + filter_width]
Print "input_array_conv:",input_array_conv
Return input_array_conv
Elif input_array.ndim == 3:
Input_array_conv = input_array[:,
Start_i : start_i + filter_height,
Start_j : start_j + filter_width]
Print "input_array_conv:",input_array_conv
Return input_array_conv
2). Convolution operation
Def conv(input_array,
Kernel_array,
Output_array,
Stride, bias):
'''
Calculate the convolution and automatically adapt the input to 2D and 3D
'''
Channel_number = input_array.ndim
Output_width = output_array.shape[1]
Output_height = output_array.shape[0]
Kernel_width = kernel_array.shape[-1]
Kernel_height = kernel_array.shape[-2]
For i in range(output_height):
For j in range(output_width):
Output_array[i][j] = (
Get_patch(input_array, i, j, kernel_width,
Kernel_height, stride) * kernel_array
).sum() + bias
3). Increase zero_padding
# Increase Zero padding
Def padding(input_array, zp):
'''
Zero padding for an array, automatically adapting the input to 2D and 3D
'''
If zp == 0:
Return input_array
Else:
If input_array.ndim == 3:
Input_width = input_array.shape[2]
Input_height = input_array.shape[1]
Input_depth = input_array.shape[0]
Padded_array = np.zeros((
Input_depth,
Input_height + 2 * zp,
Input_width + 2 * zp))
Padded_array[:,
Zp : zp + input_height,
Zp : zp + input_width] = input_array
Return padded_array
Elif input_array.ndim == 2:
Input_width = input_array.shape[1]
Input_height = input_array.shape[0]
Padded_array = np.zeros((
Input_height + 2 * zp,
Input_width + 2 * zp))
Padded_array[zp : zp + input_height,
Zp : zp + input_width] = input_array
Return padded_array
4). Forward propagation
Def forward(self, input_array):
'''
Calculate the output of the convolutional layer
The output is saved in self.output_array
'''
Self.input_array = input_array
Self.padded_input_array = padding(input_array,
Self.zero_padding)
For f in range(self.filter_number):
Filter = self.filters[f]
Conv(self.padded_input_array,
Filter.get_weights(), self.output_array[f],
Self.stride, filter.get_bias())
Element_wise_op(self.output_array,
Self.activator.forward)
The element_wise_op function is to multiply the elements of each group.
# Element wise operation of numpy array, corresponding to each element in the matrix def element_wise_op(array, op) for i in np.nditer(array op_flags=['readwrite']):i[...] = op (i)
5. Reverse propagation of convolutional layers
1). Pass the error to the previous layer
Def bp_sensitivity_map(self, sensitivity_array,
Activator):
'''
Calculate the sensitivity map passed to the previous layer
Sensitivity_array: sensitivity map of this layer
Activator: Uplevel activation function
'''
# Process the convolution step to extend the original sensitivity map
Expanded_array = self.expand_sensitivity_map(
Sensitivity_array)
# full convolution, zero padding for sensitivitiy map
# Although the original input zero padding unit will also get the residual
# But this residual does not need to be passed upwards, so it is not calculated
Expanded_width = expanded_array.shape[2]
Zp = (self.input_width +
Self.filter_width - 1 - expanded_width) / 2
Padded_array = padding(expanded_array, zp)
# Initialize the delta_array, used to save the transfer to the previous layer
# sensitivity map
Self.delta_array = self.create_delta_array()
# For a convolution layer with multiple filters, it is finally passed to the upper layer
# sensitivity map is equivalent to all filter
# sensitivity map sum
For f in range(self.filter_number):
Filter = self.filters[f]
# Turn the filter weight 180 degrees
Flipped_weights = np.array(map(
Lambda i: np.rot90(i, 2),
Filter.get_weights()))
# Calculate the delta_array corresponding to a filter
Delta_array = self.create_delta_array()
For d in range(delta_array.shape[0]):
Conv(padded_array[f], flipped_weights[d],
Delta_array[d], 1, 0)
Self.delta_array += delta_array
# Element-wise multiplication of the partial derivative of the calculation result with the activation function
Derivative_array = np.array(self.input_array)
Element_wise_op(derivative_array,
Activator.backward)
Self.delta_array *=derivative_array
2). Save the array of sensitivity map passed to the previous layer
Def create_delta_array(self): return np.zeros((self.channel_number, self.input_height, self.input_width))
3). Compute code gradient
Def bp_gradient(self, sensitivity_array):
# Process the convolution step to extend the original sensitivity map
Expanded_array = self.expand_sensitivity_map(
Sensitivity_array)
For f in range(self.filter_number):
# Calculate the gradient of each weight
Filter = self.filters[f]
For d in range(filter.weights.shape[0]):
Conv(self.padded_input_array[d],
Expanded_array[f],
Filter.weights_grad[d], 1, 0)
# Calculate the gradient of the bias term
Filter.bias_grad = expanded_array[f].sum()
4). Update parameters according to gradient descent method
Def update(self): ''' Drop by gradient, update weight '''for filter in self.filters: filter.update(self.learning_rate)
6. MaxPooling training
1). Define the MaxPooling class
Class MaxPoolingLayer(object):
Def __init__(self, input_width, input_height,
Channel_number, filter_width,
Filter_height, stride):
Self.input_width = input_width
Self.input_height = input_height
Self.channel_number = channel_number
Self.filter_width = filter_width
Self.filter_height = filter_height
Self.stride = stride
Self.output_width = (input_width -
Filter_width) / self.stride + 1
Self.output_height = (input_height -
Filter_height) / self.stride + 1
Self.output_array = np.zeros((self.channel_number,
Self.output_height, self.output_width))
2). Forward propagation calculation
# Forward propagation
Def forward(self, input_array):
For d in range(self.channel_number):
For i in range(self.output_height):
For j in range(self.output_width):
Self.output_array[d,i,j] = (
Get_patch(input_array[d], i, j,
Self.filter_width,
Self.filter_height,
Self.stride).max())
3). Back propagation calculation
# Backward propagation
Def backward(self, input_array, sensitivity_array):
Self.delta_array = np.zeros(input_array.shape)
For d in range(self.channel_number):
For i in range(self.output_height):
For j in range(self.output_width):
Patch_array = get_patch(
Input_array[d], i, j,
Self.filter_width,
Self.filter_height,
Self.stride)
k, l = get_max_index(patch_array)
Self.delta_array[d,
i * self.stride + k,
j * self.stride + l] =
Sensitivity_array[d,i,j]
See the full code at: cnn.py (https://github.com/huxiaoman7/PaddlePaddle_code/blob/master/1.mnist/cnn.py)
#coding:utf-8
'''
Created by huxiaoman 2017.11.22
'''
Import numpy as np
From activators import ReluActivator,IdentityActivator
Class ConvLayer(object):
Def __init__(self, input_width, input_weight,
Channel_number,filter_width,
Filter_height,filter_number,
Zero_padding,stride,activator,
Learning_rate):
Self.input_width = input_width
Self.input_height = input_height
Self.channel_number = channel_number
Self.filter_width = filter_width
Self.filter_height = filter_height
Self.filter_number = filter_number
Self.zero_padding = zero_padding
Self.stride = stride # Here you can add stride_x, stride_y
Self.output_width = ConvLayer.calculate_output_size(
Self.input_width,filter_width,zero_padding,
Stride)
Self.output_height = ConvLayer.calculate_output_size(
Self.input_height, filter_height, zero_padding,
Stride)
Self.output_array = np.zeros((self.filter_number,
Self.output_height,self.output_width))
Self.filters = []
For i in range(filter_number):
Self.filters.append(Filter(filter_width,
Filter_height,self.channel_number))
Self.activator = activator
Self.learning_rate = learning_rate
Def forward(self,input_array):
'''
Calculate the output of the convolutional layer
The output is saved in self.output_array
'''
Self.input_array = input_array
Self.padded_input_array = padding(input_array,
Self.zero_padding)
For i in range(self.filter_number):
Filter = self.filters[f]
Conv(self.padded_input_array,
Filter.get_weights(), self.output_array[f],
Self.stride, filter.get_bias())
Element_wise_op(self.output_array,
Self.activator.forward)
Def get_batch(input_array, i, j, filter_width, filter_height, and stride):
'''
Get this convolved area from the input array,
Automatically adapts inputs to 2D and 3D
'''
Start_i = i * stride
Start_j = j * stride
If input_array.ndim == 2:
Return input_array[
Start_i : start_i + filter_height,
Start_j : start_j + filter_width]
Elif input_array.ndim == 3:
Return input_array[
Start_i : start_i + filter_height,
Start_j : start_j + filter_width]
# Get the index of the maximum value of a 2D area
Def get_max_index(array):
Max_i = 0
Max_j = 0
Max_value = array[0,0]
For i in range(array.shape[0]):
For j in range(array.shape[1]):
If array[i,j] > max_value:
Max_value = array[i,j]
Max_i, max_j = i, j
Return max_i, max_j
Def conv(input_array,kernal_array,
Output_array,stride,bias):
'''
Calculate the convolution, automatically adapt the input 2D, 3D situation
'''
Channel_number = input_array.ndim
Output_width = output_array.shape[1]
Output_height = output_array.shape[0]
Kernel_width = kernel_array.shape[-1]
Kernel_height = kernel_array.shape[-2]
For i in range(output_height):
For j in range(output_width):
Output_array[i][j] = (
Get_patch(input_array, i, j, kernel_width,
Kernel_height,stride) * kernel_array).sum() +bias
Def element_wise_op(array, op):
For i in np.nditer(array,
Op_flags = ['readwrite']):
i[...] = op(i)
Class ReluActivators(object):
Def forward(self, weighted_input):
# Relu formula = max(0,input)
Return max(0, weighted_input)
Def backward(self,output):
Return 1 if output > 0 else 0
Class SigmoidActivator(object):
Def forward(self,weighted_input):
Return 1 / (1 + math.exp(-weighted_input))
Def backward(self,output):
Return output * (1 - output)
Finally, we use the previous 4 * 4 image data to test the output of forward propagation and back propagation through a convolutional neural network:
Def init_test():
a = np.array(
[[[0,1,1,0,2],
[2,2,2,2,1],
[1,0,0,2,0],
[0,1,1,0,0],
[1,2,0,0,2]],
[[1,0,2,2,0],
[0,0,0,2,0],
[1,2,1,2,1],
[1,0,0,0,0],
[1,2,1,1,1]],
[[2,1,2,0,0],
[1,0,0,1,0],
[0,2,1,0,1],
[0,1,2,2,2],
[2,1,0,0,1]]])
b = np.array(
[[[0,1,1],
[2,2,2],
[1,0,0]],
[[1,0,2],
[0,0,0],
[1,2,1]]])
Cl = ConvLayer(5,5,3,3,3,2,1,2,IdentityActivator(),0.001)
Cl.filters[0].weights = np.array(
[[[-1,1,0],
[0,1,0],
[0,1,1]],
[[-1,-1,0],
[0,0,0],
[0,-1,0]],
[[0,0,-1],
[0,1,0],
[1,-1,-1]]], dtype=np.float64)
Cl.filters[0].bias=1
Cl.filters[1].weights = np.array(
[[[1,1,-1],
[-1,-1,1],
[0,-1,1]],
[[0,1,0],
[-1,0,-1],
[-1,1,0]],
[[-1,0,0],
[-1,0,1],
[-1,0,0]]], dtype=np.float64)
Return a, b, cl
Run it:
Def test():
a, b, cl = init_test()
Cl.forward(a)
Print "Forward propagation results:", cl.output_array
Cl.backward(a, b, IdentityActivator())
Cl.update()
Print "Updated filter1:", cl.filters[0]
Print "Updated filter2:", cl.filters[1]
If __name__ == "__main__":
Test()
operation result:
Forward dissemination results: [[[ 6. 7. 5.]
[ 3. -1. -1.]
[ 2. -1. 4.]]
[[ 2. -5. -8.]
[ 1. -4. -4.]
[ 0. -5. -5.]]]
Filter1: filter weights: updated after backpropagation
Array([[[-1.008, 0.99 , -0.009]],
[-0.005, 0.994, -0.006],
[-0.006, 0.995, 0.996]],
[[-1.004, -1.001, -0.004],
[-0.01, -0.009, -0.012],
[-0.002, -1.002, -0.002]],
[[-0.002, -0.002, -1.003],
[-0.005, 0.992, -0.005],
[ 0.993, -1.008, -1.007]]])
Bias:
0.99099999999999999
The updated filter2: filter weights:
Array([[[ 9.98000000e-01, 9.98000000e-01, -1.00100000e+00 ],
[ -1.00400000e+00, -1.00700000e+00, 9.97000000e-01],
[-4.00000000e-03, -1.00400000e+00, 9.98000000e-01]],
[[ 0.00000000e+00, 9.99000000e-01, 0.00000000e+00],
[ -1.00900000e+00, -5.00000000e-03, -1.00400000e+00],
[ -1.00400000e+00, 1.00000000e+00, 0.00000000e+00]],
[[ -1.00400000e+00, -6.00000000e-03, -5.00000000e-03],
[ -1.00200000e+00, -5.00000000e-03, 9.98000000e-01],
[ -1.00200000e+00, -1.00000000e-03, 0.00000000e+00]]])
Bias:
-0.0070000000000000001
PaddlePaddle convolutional neural network source code analysis
Convolution layer
In the last article, we briefly introduced the function of paddlepaddle to implement a convolutional neural network. In handwritten digit recognition, when we design the network structure of CNN, we call a function simple_img_conv_pool (the link in the previous article has expired because the framework--->fluid has been updated too fast ==). The usage is as follows:
Conv_pool_1 = paddle.networks.simple_img_conv_pool(
Input=img,
Filter_size=5,
Num_filters=20,
Num_channel=1,
Pool_size=2,
Pool_stride=2,
Act=paddle.activation.Relu())
This function encapsulates both the convolutional layer and the pooling layer and can be done using only one function call. It is very convenient. If you only need to use the convolutional layer alone, you can call this function img_conv_layer, use as follows:
Conv = img_conv_layer(input=data, filter_size=1, filter_size_y=1, num_channels=8, num_filters=16, stride=1, bias_attr=False, act=ReluActivation())
Let's take a look at what parameters this function has in particular (the comments specify the meaning of the parameters and how to use them)
Def img_conv_layer(input,
Filter_size,
Num_filters,
Name=None,
Num_channels=None,
Act=None,
Groups=1,
Stride=1,
Padding=0,
Dilation=1,
Bias_attr=None,
Param_attr=None,
Shared_biases=True,
Layer_attr=None,
Filter_size_y=None,
Stride_y=None,
Padding_y=None,
Dilation_y=None,
Trans=False,
Layer_type=None):
"""
Convolution layer suitable for images. Paddle can support both square and rectangular image size input
Can also be applied to image deconvolution (Convolutional Transpose, ie deconv).
It also supports square and rectangular input.
Num_channel: Number of channels for inputting pictures. Can be 1 or 3, or the number of channels on the previous layer (number of convolution kernels * number of groups)
Each group handles some channels of the picture. For example, if an input has a num_channel of 256, set 4 groups.
32 convolution kernels, then 32*4 = 128 convolution kernels are created to process the input image. The channel will be divided into four, 32 convolutions will be first
Handle 64 (256/4 = 64) channels. The remaining convolutional core group will handle the remaining channels.
Name: The name of the layer. Optional, custom.
Type:basestring
Input: the input of this layer
Type:LayerOutPut
Filter_size: The x dimension of the convolution kernel, which can be understood as width.
If it is a square, you can directly enter a ancestor group to represent the size of the picture
Type:int/ tuple/ list
Filter_size_y: The y dimension of the convolution kernel, which can be interpreted as height.
PaddlePaddle supports rectangular image size, so the size of the convolution kernel is (filter_size, filter_size_y)
Type:int/ None
Act: The activation function type. The default is Relu
Type:BaseActivation
Groups: the number of groups in the convolution kernel
Type:int
Stride: The horizontal slide step. Or the world inputs a ancestor, which represents the same horizontal sliding step.
Type:int/ tuple/ list
Stride_y: vertical slide step.
Type:int
Padding: The zero-filled horizontal dimension. It is also possible to enter a ancestor directly. The zero-filling dimensions are the same in the horizontal and vertical directions.
Type:int/ tuple/ list
Padding_y: dimension of zero padding in the vertical direction
Type:int
Dilation: The horizontal dimension of the expansion. You can also enter a ancestor to indicate that the horizontal and initial values ​​are the same as the extended dimensions
:type:int/ tuple/ list
Dilation_y: Extended dimension in the vertical direction
Type:int
Bias_attr: offset property
False: do not define bias True: bias is initialized to 0
Type: ParameterAttribute/ None/ bool/ Any
Num_channel: Input channel of the picture channel. If set to None, the number of channels automatically generated as the upper output
Type: int
Param_attr: Convolution parameter attribute. Set to None for default properties
Param_attr:ParameterAttribute
Shared_bias: Sets whether offsets are shared in the convolution kernel
Type:bool
Layer_attr: Extra Attribute of Layer
Type:ExtraLayerAttribute
Param trans: if convTransLayer is set to True, if convlayer is set to conv
Type:bool
Layer_type: explicit layer_type, default is None.
If trans = True, it must be exconvt or cudnn_convt, otherwise it is either exconv ​​or cudnn_conv
Ps: If it is the default, paddle will automatically select ExpandConvLayer for cpu and CudnnConvLayer for GPU.
Of course, we can also choose which type
Type:string
Return:LayerOutput object
Rtype:LayerOutput
"""
Def img_conv_layer(input,
Filter_size,
Num_filters,
Name=None,
Num_channels=None,
Act=None,
Groups=1,
Stride=1,
Padding=0,
Dilation=1,
Bias_attr=None,
Param_attr=None,
Shared_biases=True,
Layer_attr=None,
Filter_size_y=None,
Stride_y=None,
Padding_y=None,
Dilation_y=None,
Trans=False,
Layer_type=None):
If num_channels is None:
Assert input.num_filters is not None
Num_channels = input.num_filters
If filter_size_y is None:
If isinstance(filter_size, collections.Sequence):
Assert len(filter_size) == 2
Filter_size, filter_size_y = filter_size
Else:
Filter_size_y = filter_size
If stride_y is None:
If isinstance(stride, collections.Sequence):
Assert len(stride) == 2
Stride, stride_y = stride
Else:
Stride_y = stride
If padding_y is None:
If isinstance(padding, collections.Sequence):
Assert len(padding) == 2
Padding, padding_y = padding
Else:
Padding_y = padding
If dilation_y is None:
If isinstance(dilation, collections.Sequence):
Assert len(dilation) == 2
Dilation, dilation_y = dilation
Else:
Dilation_y = dilation
If param_attr.attr.get('initial_smart'):
# special initial for conv layers.
Init_w = (2.0 / (filter_size**2 * num_channels))**0.5
Param_attr.attr["initial_mean"] = 0.0
Param_attr.attr["initial_std"] = init_w
Param_attr.attr["initial_strategy"] = 0
Param_attr.attr["initial_smart"] = False
If layer_type:
If dilation > 1 or dilation_y > 1:
Assert layer_type in [
"cudnn_conv", "cudnn_convt", "exconv", "exconvt"
]
If trans:
Assert layer_type in ["exconvt", "cudnn_convt"]
Else:
Assert layer_type in ["exconv", "cudnn_conv"]
Lt = layer_type
Else:
Lt = LayerType.CONVTRANS_LAYER if trans else LayerType.CONV_LAYER
l = Layer(
Name=name,
Inputs=Input(
Input.name,
Conv=Conv(
Filter_size=filter_size,
Padding=padding,
Dilation=dilation,
Stride=stride,
Channels=num_channels,
Groups=groups,
Filter_size_y=filter_size_y,
Padding_y=padding_y,
Dilation_y=dilation_y,
Stride_y=stride_y),
**param_attr.attr),
Active_type=act.name,
Num_filters=num_filters,
Bias=ParamAttr.to_bias(bias_attr),
Shared_biases=shared_biases,
Type=lt,
**ExtraLayerAttribute.to_kwargs(layer_attr))
Return LayerOutput(
Name,
Lt,
Parents=[input],
Activation=act,
Num_filters=num_filters,
Size=l.config.size)
After we understand the meaning of these parameters, we can see that paddlepaddle has several advantages compared to the CNN that we previously wrote:
Supports rectangular and square image sizes
Support sliding step stride, zero zero padding, extended dilation to set different values ​​in horizontal and vertical directions
Supports bias item convolution kernels to share
Automatically adapt cpu and gpu convolutional networks
In our own CNN, only the square image length is supported. If it is a rectangle, it will give an error. Sliding steps, zero-filled dimensions, etc. also only support the same horizontal and vertical dimensions. After understanding the parameters of the convolutional layer, we look at how the underlying source code is implemented: ConvBaseLayer.py Interested students can follow this link to see how the underlying is written in C++ for ConvLayer.
The same applies to the pooling layer, which can be analyzed according to the previous ideas. Interested parties can always see the implementation of the bottom layer and have the opportunity to analyze it in detail. (occupy the pit to make up the source of tensorflow tomorrow)
to sum up
This article mainly explains some techniques of back propagation in convolutional neural networks, including the difference between the reverse propagation of convolutional layers and pooled layers and the traditional back propagation, and implements a complete CNN, which can be modified by everyone. Some code, such as how to adjust when the horizontal sliding length is different from the vertical sliding length, etc. Finally, we studied the realization process of the convolution layer in CND in paddlepaddle, compared CNN written by ourselves and summarized four advantages. The bottom is C + + implementation, those interested can go further in-depth study. Write rough, if you have questions please leave a message:)
Light Stand,Led Light Stand,Tripod Light Stand,Light Stand For Photography
SHAOXING SHANGYU FEIXIANG PHOTOGRAPHIC CO.,LTD , https://www.flying-photography.com