Every day ZDM sees originality. For some time, she has been able to see the idea of ​​buying photos from NAS. However, the white group is very expensive, but it is not possible to connect multiple hard drives. (There is always reason for no money). Although I did not know what I wanted for NAS at the time, I did not know why I had to convince myself to get this thing. (The 1 T Western Digital hard drive is not 100G full). At that time, in order to convince myself to weed the grass, I listed several functions used to buy the NAS: 1 Put a movie on the TV in the living room, and after leaving the house, my mobile phone can continue to watch the unfinished movie in the place with wifi. 2 Make some photos on your mobile phone automatically back up. 3 Sometimes there are some good seeds can also be downloaded remotely at home, 30G-50G Blu-ray disc can not stand under a computer. 4 of your own photos and documents can be regularly backed up to ensure safety. I have such a demand, not listed, this list ~ finished! It seems to need NAS more. As I said before, I watched so many original black dresses. In fact, I was planning to build one at that time. I bought and bought the list of gods and then installed the system. It doesn't matter if the machine costs a thousand oceans. It doesn't include the bulk of hard drives. It's better to use the next Raspberry Pi 3 generation to build one. How to solidify this Openmediavault system will not say more on this side.
installationOn the official website of OMV Click the yellow part and select the installation file of Raspberry Pi to download. If the OMV's official website does not have to enter, try the download URL directly posted by me.

Select the Raspberry Pi installation file

After the download is complete, there will be a file with the .img extension. This time you need to prepare something: 1 An 8G tf card (the quality of the card must be good, whether it is not a brand goods must be resistant to read and write) 2 SDFormatter softwareThree Win32diskimager 4 Raspberry Pi (I'm 3 generations) This is needless to say.
Formatting tf cardOpen SDFormatte soft first formatted the tf card, I did not insert the card here, after you insert the card Size, Volume Lable will be displayed directly formatted.

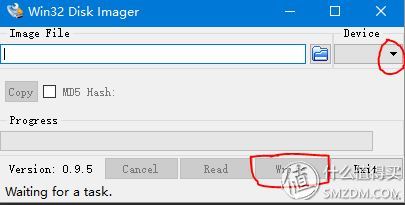
Open win32diskimager, select the downloaded system, check that the next is not ready to write the tf card, and then click Write!! Remember not Read!!!!, Then it is about 10-15 minutes of waiting. Click the blue small folder icon in the picture to select the image file. There will be a popup window for Success after writing.
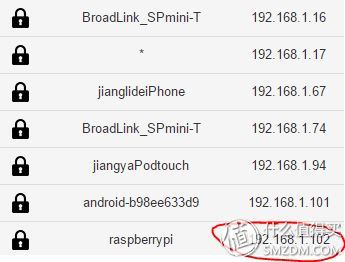
Pull out the successfully written tf card and insert it into the raspberry pie, and turn on the power. Then enter your home router's interface to view the Raspberry Pi's intranet IP address
Enter the address of the Raspberry Pi using the machine on the LAN. The login screen is followed by the default user name/password: admin/openmediavault

Note: If you haven't seen the Raspberry Pi's IP in the router interface for a long time, but the file is written without any problem, then you may need a monitor and keyboard temporarily. The HDMI connection Raspberry Pi will always appear Line window, enter the username/password: root/openmediavault will be able to enter the web interface. I have encountered this situation in the previous installation, but the latest version of the installation package is directly into the web interface, no screen start.
At this point, the Raspberry Pi's OMV installation is over.
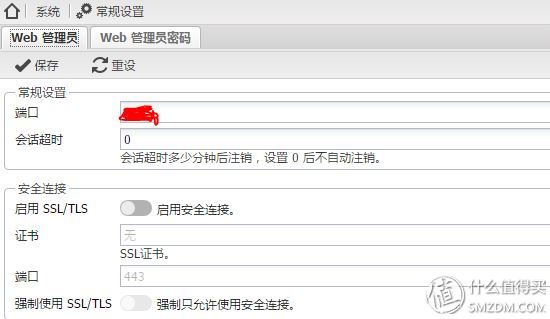
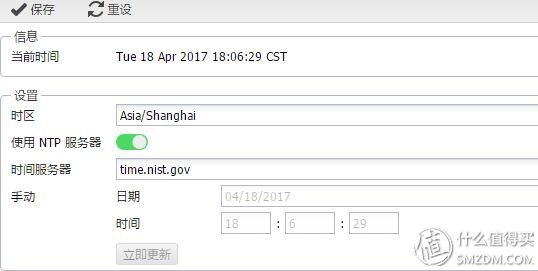
First boot update and useThe first time you boot into the web interface, don't rush to update. We change the web port and the default password first, and the time-out period changes to prevent the next long update.

Change the port number and webmaster password. After all this is done, it is to be put on the public network. The security point is good.
Choose Asia/Shanghai
Add a certificate that will be used later.

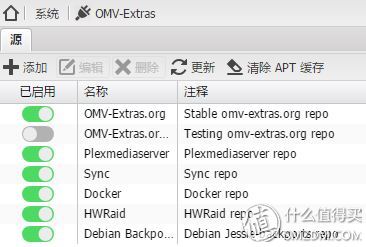
Add some sources, some testing will not be added, and the province will be in trouble. Then clear the APT cache, then click Update to prevent the author from updating the wrong version after the update is incorrect. I really happened this thing, are pits! !
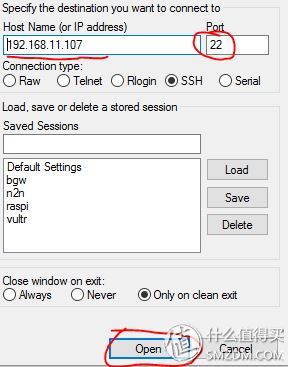
Do not hurry to see the guests, it will be an accident. The most secure is to update from the ssh client. I just fell here no less than five times. A fall is a reload of the system. How to carry out SSH connection with a word, really do not know how to consult your mother. Download putty, enter the default Raspberry Pi IP port 22, click open connection.
Enter the command twice:
1apt-get update
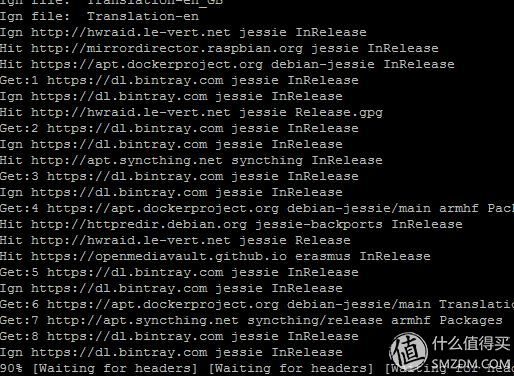
Wait for it to finish, then
2apt-get upgrade
Need to upgrade on click Y

The first time this process will be a bit long, you can go for a walk or go to watch TV and drink.
After the completion of the change in the root account password, the proposed change, after all, is to vote on the Internet. Just enter passwd and enter your new password just fine. Then type reboot to restart the machine.
The Raspberry Pi installation and update ended. It can be used normally. The first article is also over. This system is very good. There are too many things to talk about. If you have time to continue to write plug-ins and use pits, these plug-ins have very little domestic data.
End, thank you for watching.
Next: The use of OMV's daily plug-ins and pitting pits.
D-Sub Connector,6.35Mm Signal Power Connector,36Pin Signal Power Connector,Signal Power Connector
Shenzhen Hongyian Electronics Co., Ltd. , https://www.hongyiancon.com